
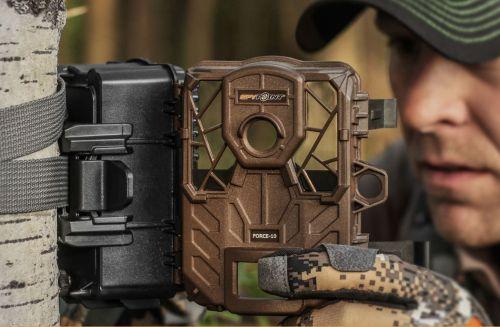
Just like the world of conventional digital cameras, there is now a bewildering array of makes, models, specifications and prices of trail cameras (camera traps), making it hard to choose the best one for you. This guide to common trail camera features, written by experienced camera trapper Dr Stephen Ellwood from Wildlife Savvy Ltd, aims to help you understand what’s what. And, acknowledging that there is a world of alternative sources of information out there, to help or baffle you, Stephen keeps things simple, while also explaining some jargon - in bold italics - that may prove useful in web searches.
HOW TRAIL CAMERAS WORK
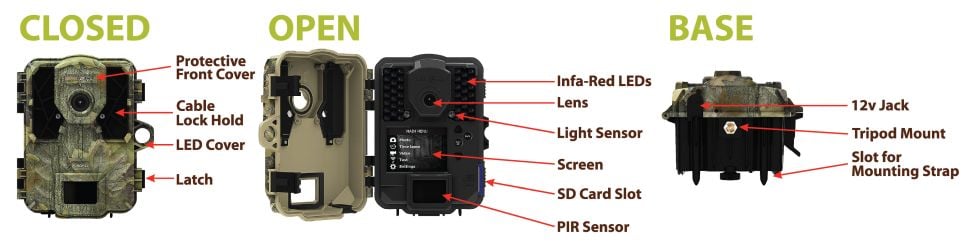
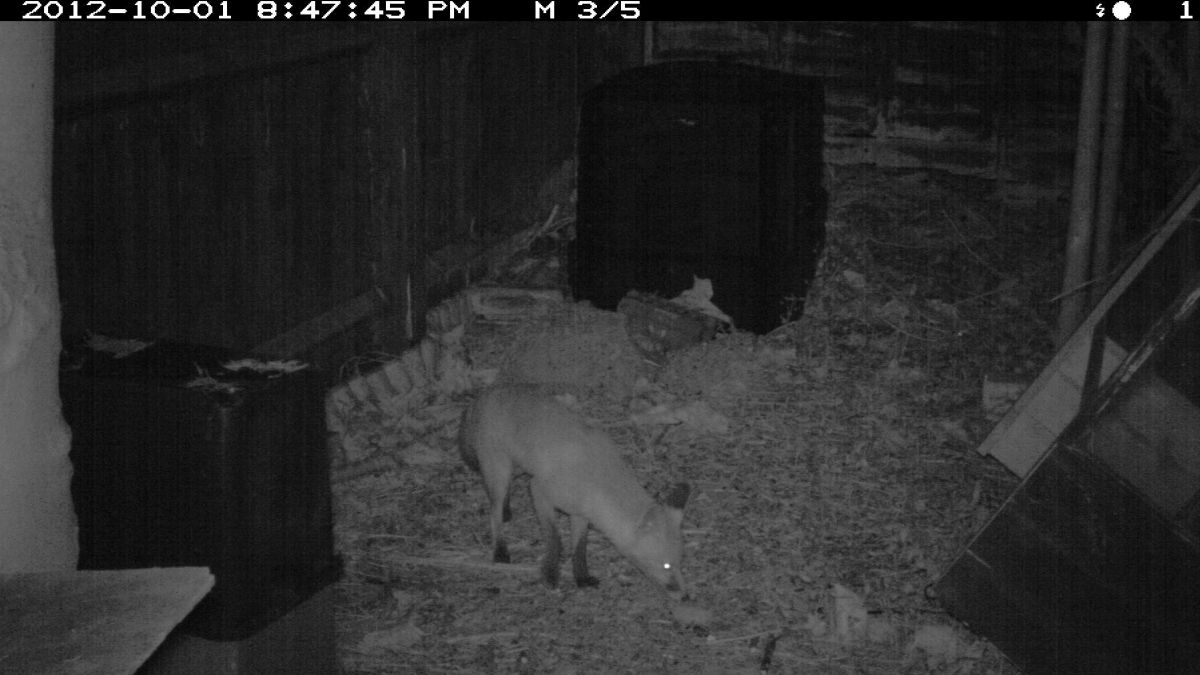
A basic description of how trail cameras work provides a useful contect in which to understand their various features. Trail cameras are designed to exist in a state of almost complete electronic sleep, much like a TV left on stand-by. The bit that is fully awake is the motion-sensor. In most trail cameras this is a Passive Infra-Red (PIR) detector, essentially the same as those seen in burglar alarms. When the PIR detects motion, it ‘wakes up’ the rest of the camera and triggers a rapid chain of events: light levels are detected and the flash turned on accordingly; focus is achieved; shutter speed is determined; one or more pictures or video are taken by the image-sensor; pictures/video are stored on an SD card (Secure Digital); the camera goes back to sleep. Just how much the camera sees (field of view) and what it can photograph is largely determined by a combination of the lens, the type of image-sensor receiving light from the lens, the level of illumination (sunlight or flash) and the trigger-time (time between movement detection and a picture being taken). Importantly, most trail cameras these days will take coloured images/video during daylight and black and white at night by using an infra-red (IR) flash - as opposed to the white-light flash of a conventional camera. The parameters required to control the camera, and mentioned in the features below, are pre-programmed by the user via a screen and user interface on the camera itself and can be changed as required. Some cameras even have a built in screen suitable for viewing images on.
KEY TRAIL CAMERA FEATURES
There are ten key features of trail cameras to consider:
1. Ability to detect animals
2. Trigger-time (time between movement detection and a picture being taken)
3. Recovery-time (time between a picture/video being taken and the camera being ready to be triggered for the next)
4. Lens
5. Flash/illuminators
6. Picture/Video quality
7. Picture/Video settings and their effects
8. Memory (SD) card
9. Power supply
10. Other bells and whistles
1) Ability to detect animals
Although some trail cameras can be plugged into external motion detection devices, most use PIRs. PIRs detect average changes in the thermal landscape in front of the trail camera and not the specific heat sources a thermal imager does. These changes in temperature occur whenever anything moves that is a different temperature to its background. As such, PIRs are as equally sensitive to cold objects moving in front of warm backgrounds as they are to the more usual warm objects i.e. animals, moving in front of cooler backgrounds – it all amounts the same thing. Similarly, a big animal moving far away is likely to be detected as easily as a small animal moving close to the camera if both represent the same temperature change relative to the background. If a very big animal is very close to a PIR, but is motionless, then it won’t be detected. It then follows that the faster the movement, and therefore the greater the rate of change in temperature, the more likely the PIR is to trigger the camera. The sensitivity of a PIR to detect these subtle temperature changes will depend on the make and model of trail camera used and only testing can determine this. Fortunately, it is easy to find independent tests on the web. Some trail cameras employ up to three PIRs, pointing in different directions, designed to anticipate animals moving into the field of view of the camera. Here the risk of pictures with no animals in shot must be weighed up against the value of anticipation and often a single good quality PIR will be more than adequate.

2) Trigger-time (time between movement detection and a picture being taken)
Once an animal has been detected, the trigger-time determines whether or not an animal is still in front of the camera when the picture is taken! This is entirely a feature of the make and model of camera and can be as fast as 0.1 seconds or as slow as 1+ second and may represent the difference between a fast moving animal being photographed or being missed altogether. Trigger-time is generally quoted by manufacturers on their websites because a fast trigger-time is a real selling point. Trigger-time is likely to be slower when recording video as it takes longer for the camera to ‘wake up’ video recording systems than those used for still images. Therefore, if you want to video fast moving animals, you should choose a camera with a quick trigger time on its video setting. Our recommendation would be to go for a fast trigger-time on still images as you’ll miss far fewer animals with this feature.
3) Recovery-time (time between a picture/video being taken and the camera being ready to be triggered for the next)
There is reduced benefit in a fast trigger-time if the camera has to spend the next minute mustering the energy to make another attempt. The very best trail cameras have no recovery-time at all and keep on taking multiple pictures in a row, but this feature is often overlooked. Imagine the scenario where a herd of deer walk in front of a trail camera but you only get a picture of the lead animal because the slow recovery-time meant that the rest had passed by before the camera was ready to take another picture. This problem can be partly remedied using video settings but, you guessed it, slow recovery-time on still pictures often means an even greater recovery-time on video.
4) Lens
Generally, most trail cameras come with a fixed focal-length (and therefore field of view) lens. This includes a fixed near-point of focus. Choosing a wide-angle lens is great for getting a lot in the picture, but individual subjects risk appearing small on the image. Whereas a narrow field of view, zoom lens, can miss a lot of detail. Some manufacturers offer a choice of factory fitted lenses for a particular make and model, and Bushnell make the Nature-View camera with user-changeable lenses specifically designed to have a very close near-point of focus – great for photographing birds on feeders. Again it is possible to find information on lenses on manufacturer websites.
5) Flash/illuminators
Trail camera flash/illuminator units are factory fitted and therefore, because the scenarios in which a camera can be used are largely determined by its flash/illuminator type, the choice of model is critical. We refer to flash and illuminator as one and the same because they are the same unit – if a still image is to be taken then the lights flash on instantaneously, whereas for video they illuminate for longer. There are three types of flash, i) white light – just like a conventional camera and used for taking colour pictures/video in the dark, ii) low-glow infra-red and iii) no-glow infra-red (aka black-flash, covert-flash). Infra-red flash produces black and white images and is normally only used at night. Infra-red light sits at the boundary and just beyond the visible light spectrum, and so infra-red flashes are far less likely to disturb shy nocturnal animals than a white light flash. Standard low-glow flashes use LED arrays emitting infra-red at a wavelength of around 850 nm. Most cameras are less sensitive to 850 nm infra-red than they are to white light, but can still generate a good quality image under this illumination. The downside of 850 nm infra-red is that there is still a faint red glow visible to the human eye, and judging by experience, also visible to animals. However, as new cameras are even more sensitive to infra-red it has become possible to use LED arrays emitting light further into the infra-red spectrum at around 940 nm. Under this illumination pictures/video may be more ‘grainy’ and flash range is reduced, but the visible glow is hugely reduced and only really visible to the human eye when staring directly into the flash unit Apart from not disturbing your subjects, infra-red flash is also useful for trail camera security. This means that cameras are less likely to be stolen because their positions are not given away by bright flashes of light in the depths of night.
6) Picture/Video quality
We’ve already mentioned how flash type can affect image quality, but the feature having the greatest effect on this is the resolution of image-sensor used. Resolution is stated in Megapixels (MP), and is simply the number of pixels recorded in a digital image. One Megapixel is one million pixels. The more Megapixels, the better quality the image is likely to be, but with the downside that a high Megapixel count will result in you using up your camera’s memory storage (its SD card) more rapidly. Most trail cameras are now 5 MP or greater, but beware of ‘interpolated’ values because these represent lower resolution image sensors but where the camera’s processor has estimated what an image would look like at higher resolution – a 12 MP interpolated image won’t be as good as a fully 12 MP one.
7) Picture/Video settings and their effects
Still pictures versus video The choice between cameras providing still pictures or both video and stills seems obvious, and we would suggest that it makes sense to go for both given that this is a provision of most cameras now and at a reasonable price. However, consider that some of the most robust, reliable and power efficient (see 9. below) trail cameras and, critically, possessing some of the fastest trigger-times on the market, only provide still images. On top of this, also consider that video needs the flash unit to provide illumination for the full duration of video (at night) and video also uses a lot of memory. Therefore, the provision of video may also be impractical for long deployments. Single still pictures versus bursts of stills versus video Building on this direct comparison of still and video, consider that most cameras now allow a sequence of stills to be taken (say up to 10), with almost no recovery-time in between, and some even offer ‘near-video’ at around two individual pictures a second. These ‘bursts of stills’ are likely to capture much of the action that video will, but with a much lower battery power and memory storage overhead. So, aiming for a camera that specialises in better quality bursts of still images might, again, be a better option compared to a generalist stills/video combination.
8) Memory (SD) card
We have already covered how various settings are likely to fill up your trail camera’s SD card either faster or slower, so you might think that it makes sense to buy the largest capacity SD card you can afford (2, 4, 6….128 GB capacity). However, you must check with the camera manufacturer what the maximum capacity SD card is for your chosen camera. This is because the file system built into SD cards is different at different capacities and you may find, for example, that you are limited to 16 GB SDs. So, if you plan to take a lot of video you may want to opt for a camera that supports high capacity SD cards. You must also consider SD card Class. Class effectively refers to the speed at which pictures/video are written to and from the SD card, with 5 classes currently available (2, 4, 6, 8, 10). The higher the number the faster the card but the more they usually cost. But, picking too low a class SD is likely to be a false economy as it will slow down the trigger and recovery time of your camera and may even prevent your camera working at all. Again manufacturers will recommend which class to go for.
9) Power supply
Trail cameras are generally powered by a bank of AA batteries within the camera enclosure. However, some models do have provision for external power supplies. This could be one of, or a combination of, DC (transformed from mains power), an external high capacity rechargeable battery (e.g. 12V lead-acid or lithium), or solar panel. These external power options have the effect of dramatically increasing camera longevity in the field compared to AA batteries, and may be especially useful if there is likely to be a heavy use of flash, especially for video. More important though, to most users, is what type of AA battery to use, or more correctly what battery chemistry – I’ll stick with ‘type’. Batteries can be split into rechargeable and non-rechargeables (primary cells). Common rechargeables include, Lithium-ion (Li-ion), Nickel Metal Hydride (NiMH) and Nickel-Cadmium (NiCad). Lithium-ion batteries tend to have specialised high voltage applications, whereas NiCads are now a largely defunct technology. This leaves NiMH. These have a lower capacity (equating to shorter deployment time) than primaries, but offer a costs saving through multiple use. However, some manufacturers do not recommend the use of rechargeables because they operate at a slightly lower voltage (1.2V) than primaries (1.5V) and may also be incapable of delivering high current. This can result in a loss of performance e.g. weak flash. But, high performance NiMH batteries do exist, for example Panasonic Enloop, which should be considered as a cost saving alternative to primary batteries. Non-rechargeable primary batteries have two common types, Lithium (Lithium-iron disulphide) and Alkaline. Lithium batteries can provide higher currents and have a greater capacity and therefore longevity than Alkaline, but they are considerably more expensive. So the choice comes down, as ever, to application, with shorter deployments and/or daytime scenarios favouring alkaline primaries or NiMH rechargeables, through to longer deployments and/or heavy night-time use of flash favouring Lithium primaries or high performance NiMH.
10) Other bells and whistles
Remote access to pictures/video
An increasingly available option now is for a camera to have a built in mobile phone modem (3G, 4G; Cellular), or WiFi transceiver, so that trail cameras can be access remotely. This allows remote download of pictures/video, a very useful feature if the camera is in a particularly inaccessible or hazardous place, or indeed where there is a great risk of ecological disturbance via human visits to cameras. However, remote access comes at both a financial cost but also a practical one because the transmission of images rapidly drains batteries.
Timelapse
This is a feature to look out for, if nothing else because it can be so much fun to experiment with. In timelapse mode a trail camera is set up to take a picture at regular intervals - say one a minute - and not only when movement is detected (some models can do both at the same time). The sequence of images can then be joined together into a movie, effectively speeding up whatever sequence of events has been recorded (one picture a minute, played back at the standard 25 frames per second of movies, equates to a 1500 fold increase in speed). This is the technique used for recording plants grow. Timelapse is very useful for picking up cold bodied animals that may not trigger a PIR, or indeed capturing images of warm bodied animals that are moving too slowly, or are too far away, to trigger the PIR.
Scheduling
Scheduling is the official term for setting on-off periods and is a great way of saving power and cutting down on unwanted pictures/video that will use up battery power and fill up SD cards. For example, you may only be interested in nocturnal animals, so you schedule your camera to only work at night.
Security
Trail cameras are expensive pieces of kit and there is nothing worse than returning to a site, excitedly anticipating the amazing pictures you are bound to have taken, only to find that your camera has been stolen. Although the first line of security should always be to set up you camera in a hidden place using as much camouflage as you can muster, a little extra physical security is useful. Many trail cameras come ready fitted with a hole through which a Python cable lock can be threaded (for attachment to a tree). Then there are ‘cages’ sometimes referred to as ‘bear-cages’ into which the entire camera can be fitted, but with a pre-cut hole for the lens, PIR and flash. As the names suggest, these help prevent damage by wildlife as well as theft.
Screen
Most trail cameras have at least a minimal screen, one digit high – more like a pocket calculator display – that is used for setting many of the various parameters mentioned above. Some, however, also come with a built in screen on which recorded pictures/video can be reviewed, but which can also be used to see what the camera sees live - a very useful tool for aiming the camera, eliminating a lot of trial and error.
Walk-test
Again, used when aiming a trail camera, a walk-test function usually flashes a light on the front of the camera when its PIR is triggered. By moving a hand or foot, in front of the camera a user can test to see if an animal moving in the desired part of the camera’s field of view will trigger the PIR and therefore take a picture. Walk-tests are great at eliminating blind-spots in the PIR’s detection range, where the camera can see something but the PIR fails to trigger a picture. Simple re-positioning on a camera – may be just tilting it a little – can ensure greater success.
Shutter speed
Those familiar with conventional photography, will know that if you want to take a picture of a fast moving object then you need a fast shutter speed – that is, a still image is captured over a short period of time during which the subject has little chance to move and cause a blurred image. However, fast shutter speeds allow less light into the camera and so may produce dimmer pictures. These conventions apply equally to trail cameras, but it is good to have the option to adjust shutter speed, even if it is at the basic level of fast, medium and slow. It could be that you just want to get pictures of birds and don’t mind if the picture is a bit dim. Some professional grade trail cameras give the user a lot more control over basic functions like shutter speed and these may be worth looking out for.
WANT TO KNOW MORE?
We have a great range of blogs that cover bat equipment, equipment updates, doormice, bat species and many more, learn more here. We stock a wide range of equipment for Badgers, camera monitoring equipment and school ecology which we’ll ship out to you with the fastest possible delivery. If you’d like to know more about any of our products, please don’t hesitate to contact us.