Did you know that one of the first people to record wildlife using camera traps and flash photography was, politician and lawyer, George Shiras III? George started photographing wildlife in 1889 and is well known for his work, which is stunning, as well as working to protect wildlife, as exemplified by his contribution towards the Weeks-McLean Act, a treaty on migratory birds.
In the 1880s George unsuccessfully attempted to capture the image of a deer using a five-by-seven landscape camera with a single lens and a slow film plate. Following this, he upgraded to a camera with a shutter but still had issues with getting close to his subjects. Between 1891 and 1894 he set up a camera with a line running from it to an anchor point with a pistol flashlight. This device which he called the camera set or camera trap would be set off by an animal and triggered a photograph. After years of experimentation, he finally had a shot that he could be proud of. It was an image of a "deer standing on a raft of floating duckweed". L'Intérieur de la Nuit or The Interior of the Night by Shiras, Bailly, and Voss is a beautiful book that showcases his work. George was a passionate protector of wildlife.
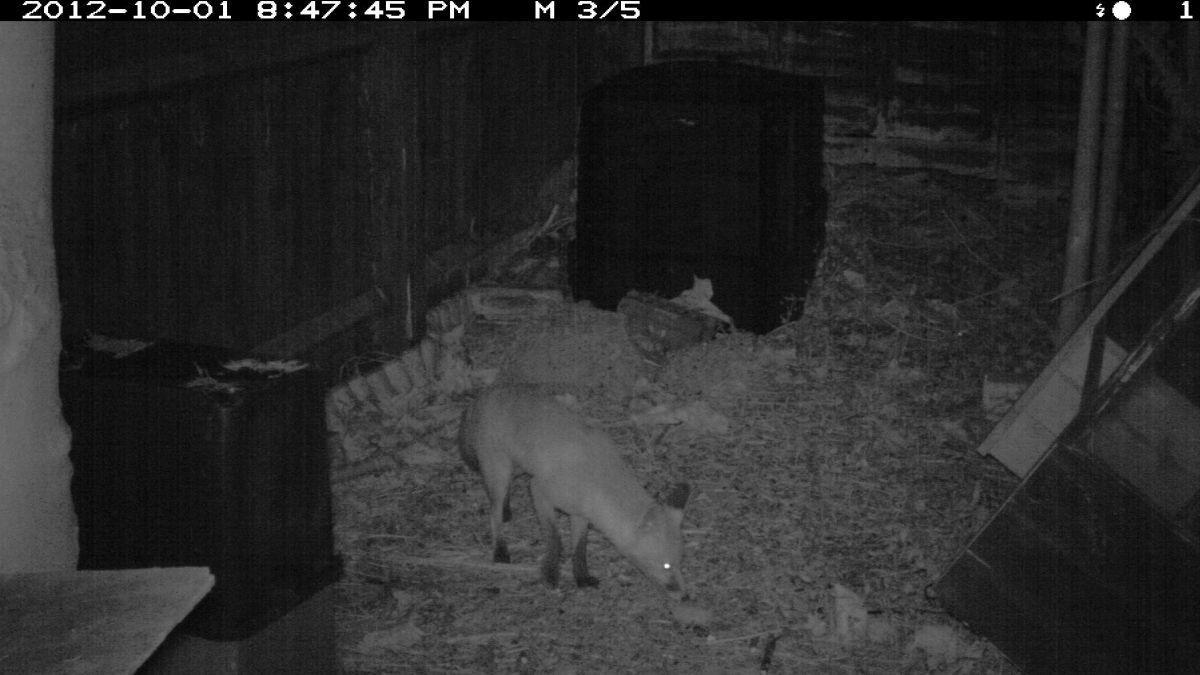
Over 100 years later, camera trapping is a well-established method of ecological survey. They are a brilliant piece of equipment and ideal for capturing large amounts of data on the natural behaviour of animals and allow you to survey elusive species in an unobtrusive manner, over a long period of time. As demonstrated by George Shiras, camera trapping provides a permanent record of a time and a place. This is important for collaboration, peer review, and showcasing your work!
The use of camera traps is still leading to stunning photography today. A couple of years ago William Burrard-Lucas demonstrated how he could transfer his techniques of camera trapping in Africa to capture images of an owl in Essex, UK. It is clear that it takes a lot of patience.
Camera traps are tricky to set up, but perseverance will lead to an intimate shot of your subject. Once a camera trap is set up it can be left to do all the work until you are ready to retrieve it.
Top Tips
- Know your subject - Where are they likely to go? Are there areas that they frequent? Is there a resource that they use? Are they predictable in their movements? Observe their behaviour. Look out for evidence of their presence, such as
- hair or feathers,
- droppings,
- footprints and claw marks,
- well-trodden paths - a good sign of an active area
- bottlenecks - an area of limited movement
- Composition - If you are interested in surveying your subject or just getting a nice photograph or video then you will need to think about how the animal will be framed. Setting up the camera trap in a bottleneck will allow you to compose the shot and get nice clear footage. It is always a good idea to avoid moving vegetation as this will trigger the camera constantly. Do a run-through with the equipment to find the ideal setup, and take care to think about the height at which you set your device, in direct relation to the height of your subject and your field of view. set up bait and lures to encourage your subject into your 'frame'.
- Know your equipment - Each piece of equipment will have features that will need to be set up. Getting to know your equipment will come over time. Get an idea of how your equipment will influence your subject. Bear in mind that you will need a settling in period. Try to use some sort of camouflage if the camera trap isn't camouflaged already.
- Set up intervals - set up your camera to record for a set amount of time when triggered, with intervals in between (3-5 seconds). This ensures that the camera is not recording continuously, which will inevitably run down your batteries and use up memory.
- Set up to video rather than photograph - This will give you more rich data about animal behaviour, allow for better identification, and give a clearer, less blurry shot of your subject.
- Maximise your memory - One of the worst things that can happen during a long-term survey is not assessing the memory capacity and running out of space. SD cards can go up 1TB (a whopping 1024 gigabytes), however, you should check what capacity and type is supported by your device before deciding.
- Be prepared for all sorts of weathers - When you set up your camera trap, it is likely that it will be in place for a prolonged period of time. It should be resilient in all sorts of conditions, as it will face humidity, rain, extremes in temperature, etc.
- Stay away - Try to stay away from the trap for the survey period (unless, of course, you need to). You will need to avoid contaminating the scene with your scent.
- Take care - It is important to remember that camera traps should be used with wildlife and ethics in mind. And also in a way that will protect your equipment.
- Do not disturb your target subject (or other species)
- Seek a landowners permission before you deploy a trap
- Avoid deploying in places that will invade privacy, such as along public rights of way and public spaces. In November 2020, Sharma et al, considered the ethical aspects of camera trapping.
- Set your camera up in a place that is out of sight, so that it doesn't get taken by an opportunist.
- Power considerations: Place your device so that it is south facing if it has a solar panel, to enhance performance.
More information about camera traps can be found in one of our blogs by Stephen Ellwood, of Wildlife Savvy, titled 'A Guide to Common Trail Camera Features'.
Get your tech on!
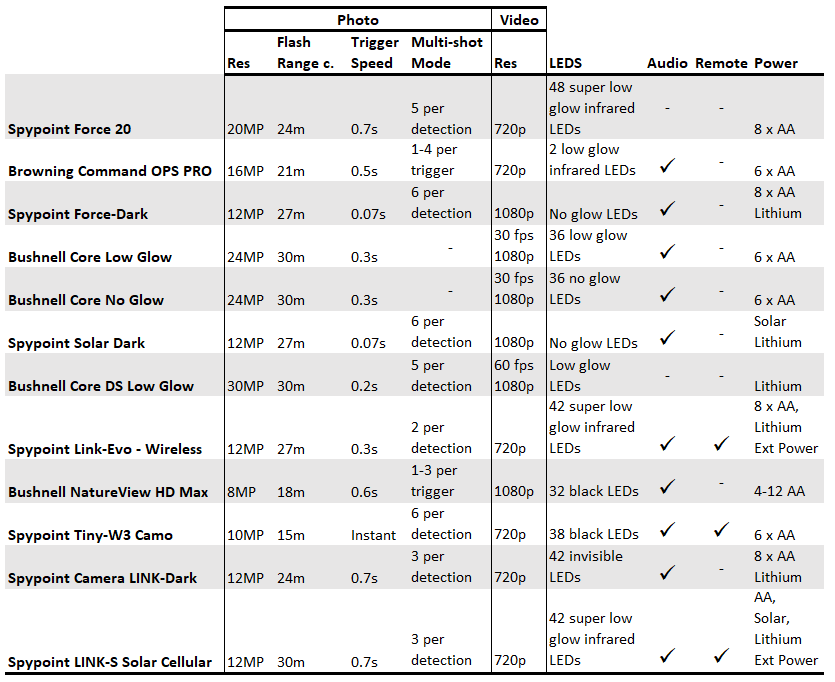
Our range of 16 trail cameras showcases the affordable, at just over £100, to the more luxury, at just under £500.
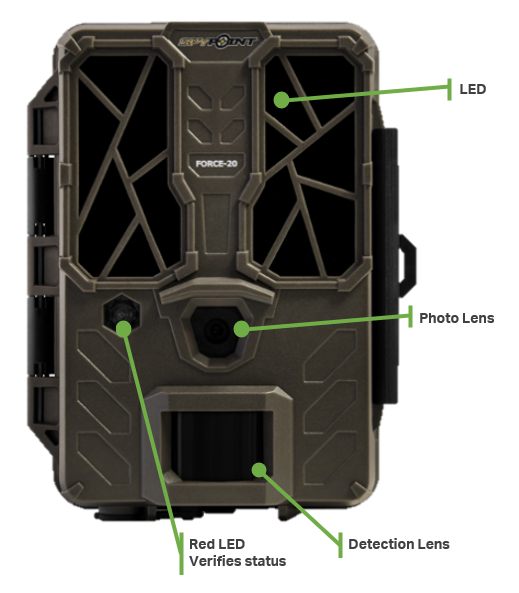
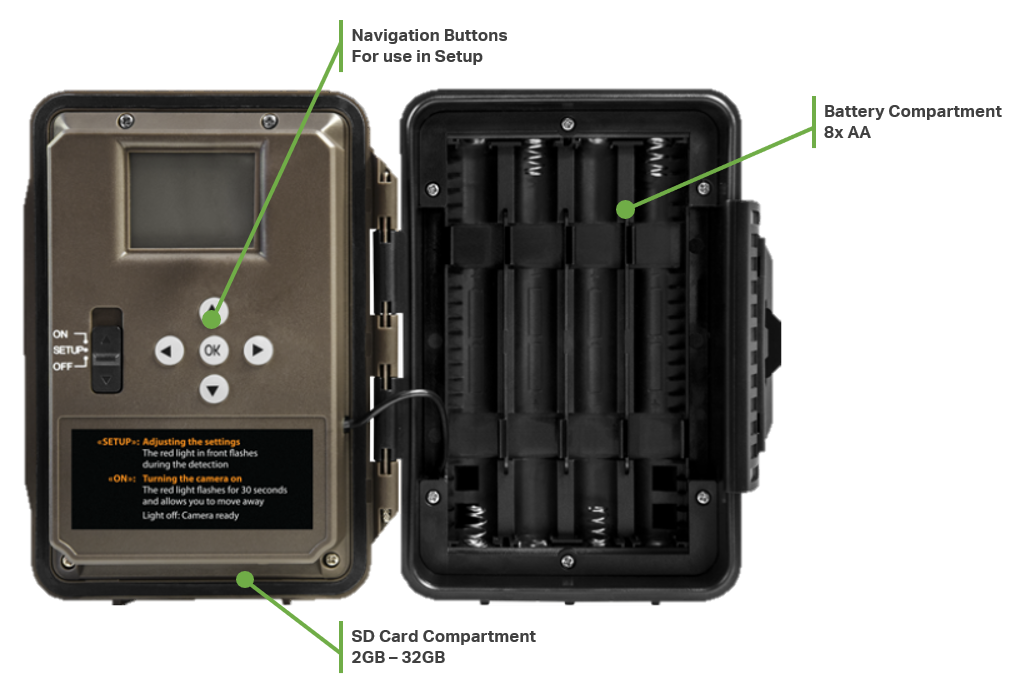
Spypoint Force 20
At the lowest end of the range, and the most affordable is the Spypoint Force 20 Trail Camera. This is a compact device that captures images at 20 megapixels and HD video at 720p, which is more than capable in terms of detail capture. This device has an impressive 48 low glow LEDs which yield high-quality night-time images. Low glow means that they produce a red glow from the infrared emitters when the camera is activated, however, the glow is subdued to the point that it does not disturb the subject.

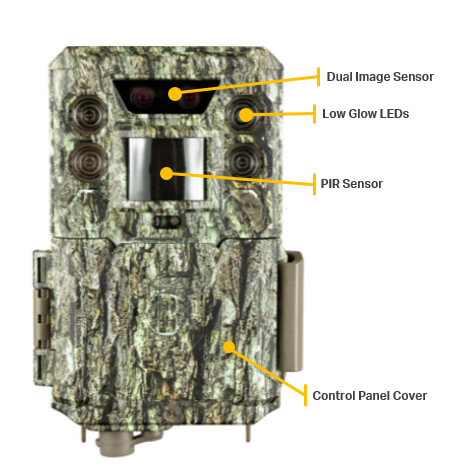
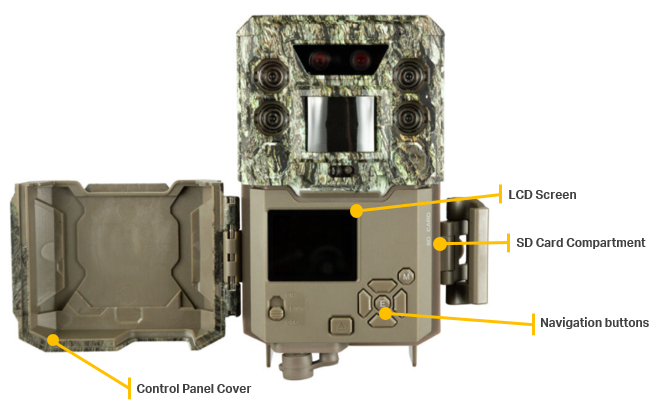
Bushnell Core™ DS Low Glow Trail Camera
The mid-range choice is the Bushnell Core™. This trail camera has Dual Sensor technology providing two image sensors, giving optimised, sharp images during the day and consistent, enhanced illumination at night. Its 30MP resolution, 30m night range, and 0.2-second trigger speed gives high contrast images with no washout. The video resolution comes in at 1080p at 60 frames per second giving you clear images night and day. Much like the Spypoint Force 20, the Core™ also features the low glow infrared technology so that any artificial LEDs are subdued.

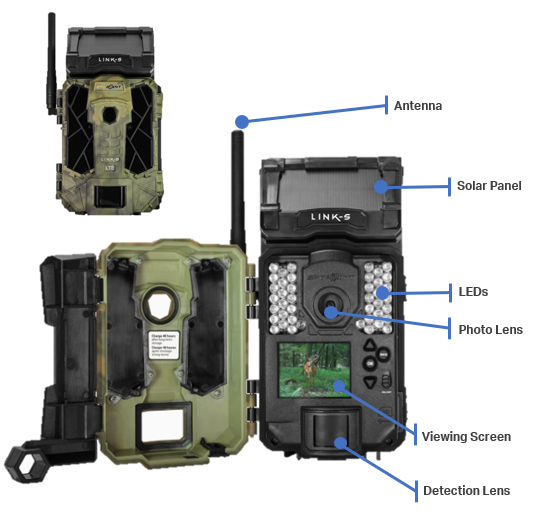
Spypoint LINK-S Solar Cellular Trail Camera
The LINK-S has been designed for those hard to reach places that you do not want to visit too often. It incorporates an on-board lithium battery and solar panel so that battery life is optimised, and features cellular technology which transfers images to the Spypoint app so that you can save time, and access your data remotely. This device has a very quick trigger speed (0.07 seconds), ensuring that fewer images are missed. Other features include a flash range and detection range of 30m, and image modes including; photo, multi-shot, time-lapse, and HD 720p video.


Comparison Table